Pages

Showing posts with label Sweets. Show all posts

Wednesday, July 23, 2014

Mochi with my Sister

I don't get to see my family very often anymore. This is, of course, compared to seeing them every single weekend or to living with them. Now, we get to spend a spare weekend together here or there, as our transportation and schedules allow. I work until Friday evening and train in Jujitsu Saturday mornings, so what weekend time we do have together is slim when we have it. Compared to waking up to my family every single day, I hardly see them at all now.
When we do get to spend time together, it's precious, rambunctious, and over stimulating all at once. Children standing as high as my hip and shorter wrap their arms around me like living straight jackets and bounce. Sister M and Sister R gather up their crafts or art projects to show them off to me. Brother P and Brother D ask me how I've been and what I've been up to- Brother D will ask in Japanese and I'll respond by telling him to make a muscle. Brother P will drag me out side for just a minute to show me some new trick he's figured out or to make me play with him. Sister H will be wiping off her hands from working in the kitchen of turn away from her computer for a bit to catch up with me. Mom will be working in the kitchen, dashing through house work, and trying to get a chance to sit with me and chat- all at once.
Eventually, the buzz will simmer down and we'll sit together for a family dinner.

Sometimes, we'll have the chance to squeeze in projects.
Once such weekend, Sister H planned and plotted so that she and I could make Mochi together.


Mochi is a Japanese sweet made of sugar and rice flour mixed into a paste, steamed, and then stuffed and shaped. It's one of my favorite things to eat.


We used this video tutorial as a guide.


Our mochi didn't turn out much like the mochi from the Asian Market I love so much, but I don't think that was the point for me. Rather than having just a normal, haphazard visit with my family that weekend, I can remember something special that my sister wanted to do with me. She carved out time, energy, and focus (not to mention mochi supplies) to spend time with me. Gifts like that are precious, especially when life is rambunctious or overwhelming.

Wednesday, July 9, 2014

And we all Live in the House of Jackfruit


This is Jackfruit.
Say hello.


This one was 14 pounds when we picked it up from Hong Kong Market, and it was the smallest one available.
The jackfruit has a thick, tough skin that oozes latex sap when cut. The fruit inside is surrounded by "rag," strong, soft fibers much like the equally inedible bits of the inside of an artichoke. The golden fruit encases a large smooth seed, which is further wrapped in a thin lining like hard vellum. The whole fruit smells funky- like an overripe bunch of bananas- and, while not strictly bad-smelling, it's certainly overbearing. The sap is a devil and a test of character. It gets on everything and only oil will remove it. It will cling to and coat your knives, hands, and counters. A thorough rub with peanut butter easily cleaned it up afterwards, but slicing the dang fruit was torturous.
Torturous, but worth it.


The golden insides do not stink or stick and they taste wonderful. It's firm and slick, tasting like perfect mangos and bananas with a hint of pineapple and pear, or an edible pina colada.
The seeds are edible, too, and there are dozens in one jackfruit. They are very starchy and should be boiled until tender in just enough water to cover them. They can be eaten as a snack with salt, pepper, and a light sprinkling of lime juice; or mashed with butter like mashed potatoes; or roasted like chestnuts; or added to a stir fry in lieu of water chestnuts. Just be sure to slip off the vellum-like casings before noshing.

Boiled in water to cover, cleaned of the outer casing,
and tossed with salt, pepper, and lime juice.

The fruit can be eaten plain, and I've taken to chopping a good handful into a bowl of plain yogurt with hemp hearts for breakfast. It can also be added to salsa the same way some folks like to add mango.


It's good cooked too. I've made a Chicken and Jackfruit Curry, Cheese-stuffed Jackfruit, and Caramelized Jackfruit eaten on vanilla ice cream.


Caramelized Jackfruit
Serves 2 generously.

1 tablespoon Butter
1 heaping tablespoon Brown Sugar
1/2 cup Orange Juice
1/2 cup, well packed, Jackfruit Pieces

Melt the butter and the brown sugar together in a pan over heat, stirring until you have a warm, brown paste.
Add orange juice and stir together until all the lumps are gone.
 Bring juice to a simmer then add Jackfruit. Let it simmer for 4 to 5 minutes, swishing it around with a wooden spoon. Wait until the juices have become thick, syrupy, and reduced like in the picture below. Serve immediately on ice cream.


You'll start with this^, simmer it till it looks like this^

 Then spoon it over ice cream so you can have this!

It's caramel-y, fruity, hot, and oozey. Enjoy!


P.S.
I'm sorry for going AWOL. I'm happy to be posting again.

Friday, June 13, 2014

Happy Birthday!


My best friend, Casey, moved away a few years ago, and I missed her horribly. She would visit once in a while and we'd have the best time traipsing around the city, eating lunch alfresco, exploring places we had never been. It was on one of these visits that I found out her favorite fruit was watermelon.


I never much cared for it and couldn't really enjoy it. It seemed like a really messy way to eat water. Then one day, when I was 8 years old or so, I was able to put off homework by eating slice after slice of watermelon. That made it that much more enjoyable.
But the best way to make me really like something, is to see someone I love enjoy it. There we were, Casey and me, sitting under the summer sun in our city, eating lunch, and she had a big bowl of watermelon and a smile. After that, I made sure we got watermelon every time we hung out the rest of that summer.

 
Then, after she went back out of state, I found this recipe over a year ago and I saved it for her return. Finally, this year, I was able to make some for her birthday.

I made some modifications, of course.
I cut the sugar in the watermelon syrup and didn't strain it.
I increased the amount of watermelon in the curd and left out the dye.
Though yummy, the curd won't taste much like watermelon immediately once it's made. After a night in the fridge, however, the flavor becomes much more apparent.
I chose an entirely different cake recipe: Genoise.

Watermelon Syrup
Equal parts Watermelon juice and Sugar.

Liquidize watermelon flesh in blender. I made 3 cups. Pour into a container with an equal amount of sugar- so I added 3 cups of sugar. Give it a good stir and let sit covered in the fridge as least 6 hours.


Watermelon Curd
5 Tbs Butter
1 cup + 2 Tbs Sugar
2 Whole Eggs
1 Egg Yolk
5 Tbs Watermelon Syrup

Cream the butter and sugar then add the eggs, one at a time, fully incorporating after each addition. Add the yolk and cream until smooth. Cook over low heat, whisking constantly. Once thick like pudding, remove from heat and continue whisking for a few minutes. When the curd has reached room temperature, add watermelon syrup one tablespoon at a time, fully incorporating with a whisk after each addition. Spoon or pour into jars and refrigerate.


Genoise Cake (From Williams-Sonoma Mastering: Cakes, Frostings & Fillings)
4 Tbl Unsalted Butter
1 1/2 cups Cake Flour OR 3/4 + 3/8 AP Flour and 3 Tbl Cornstarch
8 Large Eggs
1 1/3 cup Granulated Sugar
1 tsp Vanilla

Equipment
A small sauce pan
A Sifter
A double boiler
A whisk
A large bowl
A small bowl
A hand held mixer or a stand mixer
A rubber spatula
2 9 inch round cake pans
Parchment
Butter and flour for dusting the pans and parchment
A testing stick
A sharp serrated knife

Now don't let that scare you.

Preheat the oven to 350F and prepare the pans by lining them with parchment, greasing them, and then sprinkling with flour.

Sift the flour (and the cornstarch, if using). This is very important.
Melt the butter in your small sauce pan. Set up the double boiler- the water should not touch the bottom of the bowl- and bring it to a simmer.

Whisk the eggs and the sugar in the double boiler until well blended. Keep whisking over the simmering water for about 3 minutes until sugar is dissolved and the eggs are warm. Use an instant read thermometer if you want to be detail oriented. It should read 120F.

Pour the warmed egg mixture into a stand mixer, or remove the bowl and start running your hand mixer. Beat the eggs on medium high until they reach the ribbon stage. They'll be thick, pale yellow, and it will fall back on itself like a ribbon when you lift the beaters.

Hold the sifter over the eggs and sift a third of the flour in. Gently fold the flour in, making sure not to deflate the eggs. Repeat with the rest of the flour.

Drizzle in the butter (re-melt, if need be) and the vanilla. Gently fold them in.

Pour the batter evenly into the two prepared pans and bake for approximately 18 minutes until golden and firm to the touch.

Remove from oven and let cool for at least 10 minutes before removing from the pans.

Watermelon Cake, Assemble!

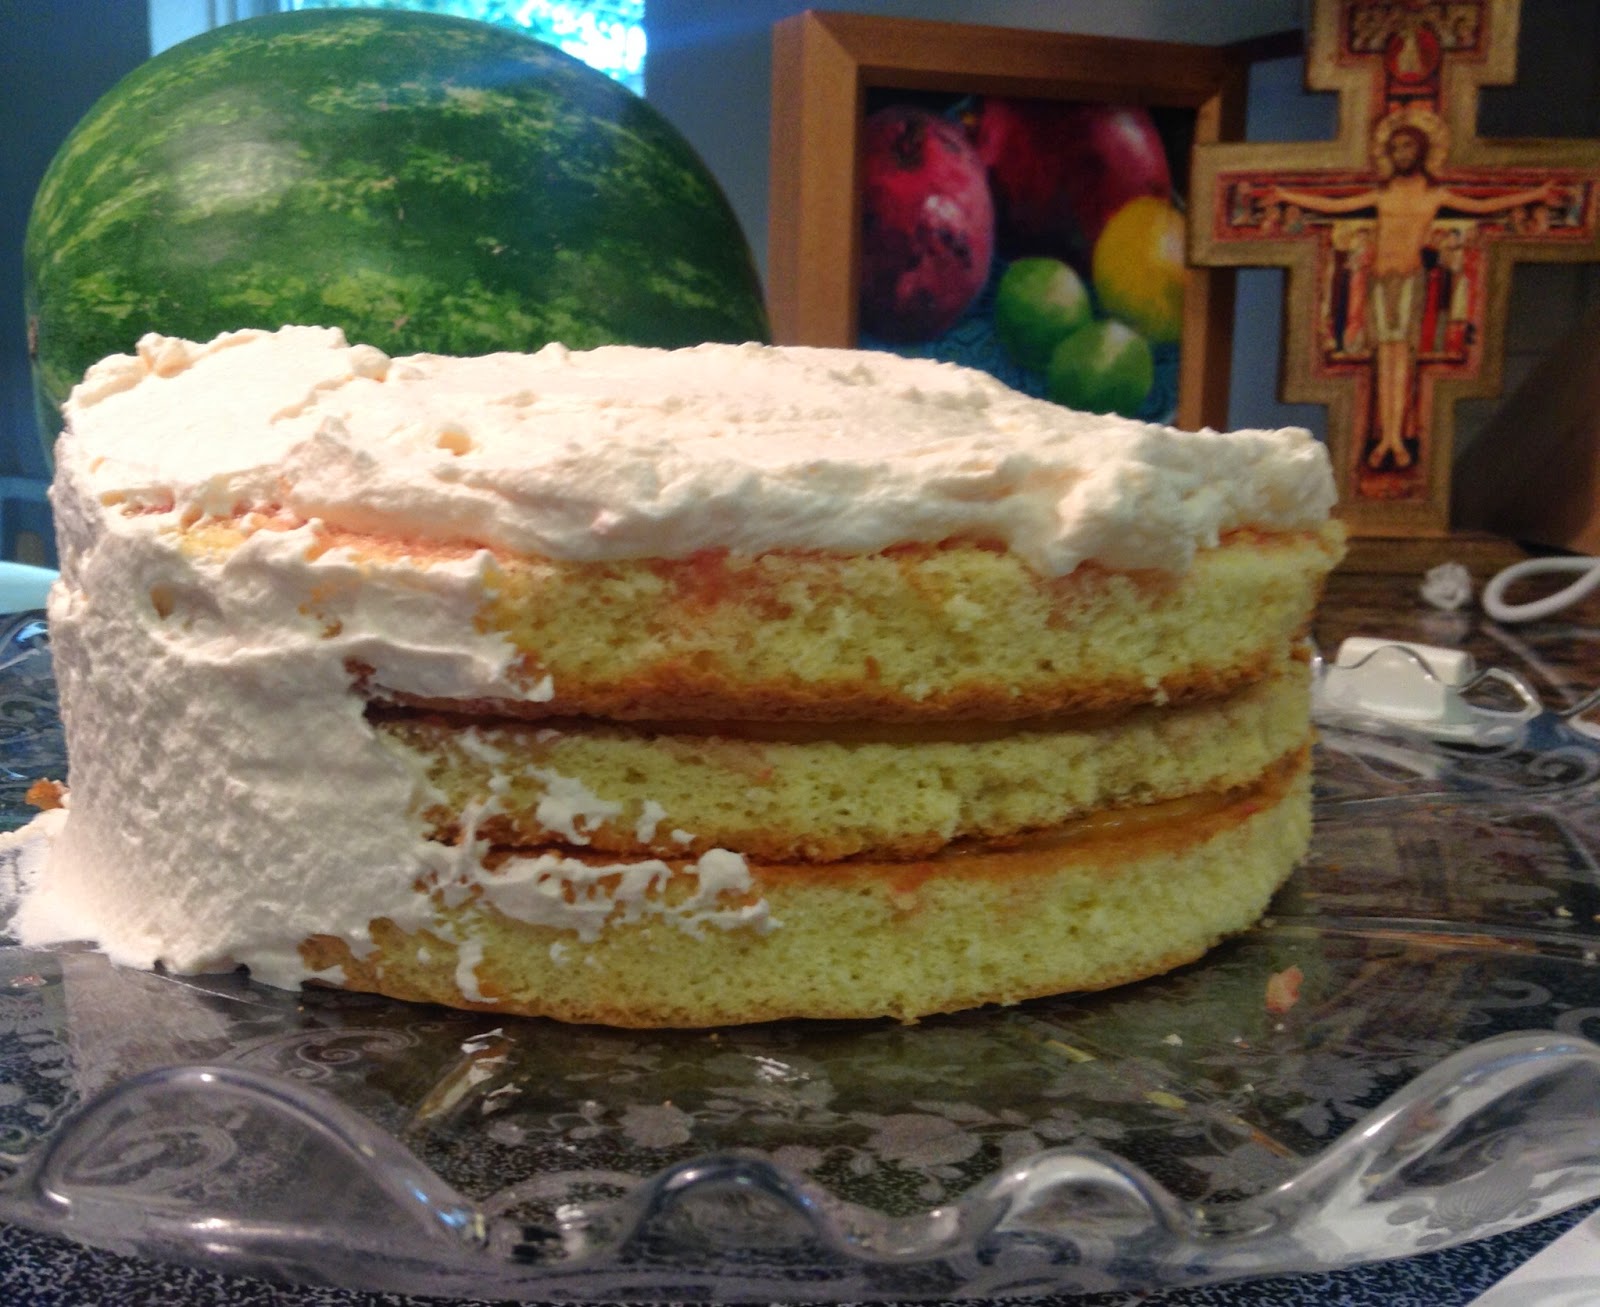
Trim any ragged edges from the 2 cakes using the serrated knife. Cut each cake horizontally into two layers. Brush the cut side of each layer with watermelon syrup, let it soak in, then brush again. Repeat as many times as you like, just let them dry a bit before each application.

Optional: Take one of the layers and cut out three to four circles from it to make a mini cake.


Place one layer on a cake stand or serving plate. Plop on a generous dollop of watermelon curd and pipe watermelon cream in a thick circle around the edge. Place a second layer on top and repeat with the curd and the cream and the cake until you've used all the layers. Slide wooden skewers into the cake for a bit of stability and to keep the whole thing from sliding. Do the same with the mini cake layers, if you choose.

Plop a whole lot of cream on top of the cake and spread it gently over the surface with an offset spatula, evenly coating the cake. Coax the cream down the sides and add as much a you want as the need arises. Do the same with the mini cake.


Mini Cake Bonus: Cut a heart out of the scraps you used to cut the mini cake and set it on top of the assembled cake, pink side up.


Pop the whole thing in the fridge to let the cream firm up before serving.

Slice.


Yum.


Tuesday, April 29, 2014

Hemp Hearts and Peanut Butter Cookies

I was going to type up some little journal entry, but I'm too tired. This past weekend was a drawn-out series of social and physical exertion and I'm fork-poking done. This coming weekend will be just as bad.


Fortunately, these cookies are easy and satisfying. They are made with hemp hearts and peanut butter with a few other things thrown in for good measure. I ate them for a snack yesterday and again for breakfast today.


If you are one of those people that needs motivation to scarf cookies, then you should know that three tablespoons of hemp hearts packs 10 grams of protein and a veritable potpourri of vitamins and minerals. Add the peanut butter's stats to those numbers, and you're good.


Crunchy Hemp PB Cookies
Adapted from Adam Hart's Recipe
2 dozen cookies, depending on size.

1 cup Hemp Hearts
1 cup Crunchy Peanut Butter
2 Large Eggs
1/3 cup Brown Sugar
1/2 tsp Baking Soda
1/2 tsp Cinnamon
1/2 cup Rolled Oats

Mix all ingredients in a bowl. Roll dough into balls and place on a greased cookie sheet. Flatten with the greased bottom of a glass. Bake at 350 F for 10 minutes.

Yum.

Thursday, March 13, 2014

The Quest for Pie Continues

Dear, sweet Vinegar Pie. Oh! How I've missed thee!

And with that, you probably think I'm insane.
Unless you've had vinegar pie. Then you know as well as I how yummy, smooth, and sweet that odd-sounding desert can be.

Since this is Pi(e) Month and tomorrow is Pi(e) Day, now is the best time for me to extrapolate on Vinegar Pie.

It's a great pie full of simple ingredients you should already have in your cupboard. Word has it that this pie was popular among American pioneers because it delivered bright flavor without using fresh fruit- which spoiled and was only available with the seasons. The prairie wife could serve something sweet and satisfying to her family at the end of a hard day full of sweaty work regardless of the time of year. And the ingredients are cheap- vinegar, egg, sugar, a touch of flour, and whatever flavoring one has kicking around in the back of the cupboard. If you keep a basic pantry, keep this recipe. You can easily whip it up at a moment's notice for impromptu entertaining or sweet-tooth attacks without a grocery run.

It's been over a year since I last made it way back in July of 2012. Wanting to make it again, I followed the link to my old recipe from the Heritage Recipes website.

And I found nothing.
The site was gone.
I was devastated.

Of course there are other recipes that I can use. However, I wanted to continue my old experiment of making the perfect vinegar pie, and every good experiment requires control group to compare any possible findings against. My 'control' was that recipe. I needed it!

Fortunately, other people needed it too, and they took preemptive measures, caching the recipe in nooks and crannies of the internet to share with people like me and preserve for themselves.

So, before I lose the recipe again, I'm copying it here for you.

Many thanks to Lorna-Organic for posting this on the idigmygarden.com forum.

Vinegar Pie
2 tablespoons butter
½ cup sugar
3 tablespoons flour
2 tsp. cinnamon
½ tsp. ground cloves
½ tsp. ground allspice
1 egg, lightly beaten
2 tablespoon cider vinegar
1 cup water
1 9” pie crust that had been briefly baked (about 3 minutes) at 450 degrees

Preheat oven to 350 degrees. Cream butter and sugar. Sift together flour and spices then add to flour mixture, mix well. Beat in egg, vinegar and water. Pour into a double boiler and cook over boiling water until thick. Pour into the pie shell and bake about 30 minutes or until a knife comes out clean.


Here's another antique recipe, also courtesy of Lorna-organic
Pioneer Vinegar Pie

1 egg
1 heaping tablespoon flour
1 c sugar

Preheat oven to 350 degrees. Beat these ingredients together and add 1 tablespoon of sharp vinegar and a cup of cold water. Flavor with a little nutmeg and pour into an unbaked pie shell. Cover with second pie crust and flute edges. Bake for an hour.


And finally, here's my slight variation. The extra egg ensures that you get a thicker custard and a deeper pie, and the flavoring is wonderfully complex on the simple vinegar custard background.


Spiced Vinegar Pie
2 Tb butter, softened at room temperature
1/2 cup sugar
2 eggs
1 tsp vanilla
2 Tb apple cider vinegar
1 cup water
3 Tb flour
2 tsp cinnamon
1/2 tsp cloves
1/4 tsp ginger
1/4 tsp nutmeg
4 whole cardamom pods, cracked
Pie crust - either a blind-baked pastry crust or a cookie crumb crust. I used espresso shortbread cookie crumbs and butter for mine.

Cream butter and sugar, then beat in egg, water, vanilla, and vinegar. Add the flour and spices, except the cardamom pods. Whisk smooth.
Pour into a double boiler and drop in the cardamom pods. They will steep in the custard as it cooks, but you'll remove the pods. Cook the mixture, stirring frequently, until you have a thick custard. Don't be impatient and don't fret if it takes a while. Let it take its time- about 10 full minutes.
Once it's thick, fish out the cardamom pods and lick them clean discard. Pour the custard into your pie crust and bake at 350 F. for 30 minutes, or until an inserted knife comes out clean.


And, before we go off to make our last-minute pies for Pi(e) Day tomorrow, a gif for the month.

It's 3-14, y'all.

Pi Month celebration with lokibubbles and aranelbaggins !
(And anyone who wishes to join!)
(Thank you, Timey Wimey Limey, for your Pi(e) gif!)

Tuesday, March 4, 2014

Mardi Gras - This Happened

My family has celebrated Mardi Gras in our own way for the past decade. We open our home, pour pancakes, and drop our dried-up Christmas trees on a leaping bonfire. It's not decadent, involves no parades or plastic beads, and I see that for the best.

But this year, there's a break in our tradition and I am away from home working during the week. Without our family pancakes, I must fend for myself and celebrate with my nanny-family.
Apparently, I must do this with Banana Funnel Cakes and Deep Fried Fudge Pop Pies.


Banana Funnel Cakes
2 bananas
4 eggs
1/2 tsp baking powder
10 Tbs flour

Smash the bananas thoroughly with a fork, potato ricer, or pastry cutter. Stir the eggs in well, then add the baking powder and flour one tablespoon at a time. You may not need all the flour, or you may need a little more, depending on the size of your bananas or eggs. Just keep adding until you're pleased with the texture. You want it to be like pancake batter.

Heat up a couple inches of oil in a wok until a bit of batter sizzles and rises when dropped in. While it's heating, spoon the batter into a zipping plastic bag, seal, and snip the corner. When the oil is hot, squeeze the batter into the wok, circling the batter around to make connected loops. Alternatively, you could spoon the batter into a funnel over the hot oil, thus making your cake genuinely funnel. When golden at the edges, flip, let sizzle for a few seconds, then scoop out and set on paper towels or on a rack over a plate. Repeat with remaining batter.

Makes 4 funnel cakes.


 We topped ours with fruit salad and drank milk, so it's totally part of a balanced breakfast. Or Dinner. Or whenever you decide to get down with your bad self. But don't worry- these won't make you too bad. Bananas and eggs are the main ingredients, after all- good, healthy potassium and protein. And, you can mound justifying fruit on top, too.
The bananas were very flavorful in the final soft, fluffy, crunchy product. Incredibly yummy.


Deep Fried Fudge Pop Pies.

Pie Crust Dough
Ice Cream Pop
Oil in a Wok
Just a touch of insanity
The ability to work fast

Roll the pie crust 1/8 inch thin. Gently pull the stick out of the popsicle. Lay pop on the pie crust and cut out a portion large enough to fold around the pop. Fold and pinch the edges securely. Don't use egg to seal. Make sure there are not holes or gaps in the dough.
Use a scrap of dough to test the heat of the wok. When it's hot enough, drop in the pop pie and watch it attentively. When the edges are golden, flip. Let sizzle for a few minute until done then remove and drain on paper towels or rack over a plate. Enjoy immediately.


The D.F.F.P.P.s were incredible. The dough cooked up to a tantalizing gold that crackled on the tongue, giving way to cold and melting chocolaty, oozy goodness. Hot and cold, crispy and creamy danced in the mouth and- yes- dribbled down the chin. I did say oozy. One bite and the pie dripped its decadent filling on whatever it could. The mess was worth it though, and possibly added to the fun. There we were, standing in the kitchen, rolling ice cream pops in pie crust and deep frying them. Chocolate coated grins added to the childish feeling welling up in our hearts. Perhaps that feeling of being a kid again was more of a neurological condition brought on by the sudden spike in blood sugar. Perhaps. I did, after all, find myself saying "yolo" at one point during the feasting, so it very well could have been sugar-shock. Still, it was worth it.


But what if I'm compelled to make these again next year?


Why don't I mind?
I'm smitten with these. That's why. Please, nobody intervene.
Yes, Lent will be spent in detoxing. Don't worry, Mother. Don't worry, blue jeans.

To conclude, I'd like to add a public service announcement. Tomorrow begins my Lenten Daily Way posts. You'll notice at the top of this page there is a second tab. On Wednesday, and every day in Lent thereafter, visit that tab to read a section from St. Josemaria's The Way. I know this is a food and life blog, and so it may be a tad out of place here, but this is one of the things I'm doing this Lent. I hope you'll join me.

Thursday, January 16, 2014

New Year and Cake!

Happy New Year!

I usually do make resolutions for the New Year. They last until Spring starts to kick in. By then the resolutions have become habits, or the year is no longer 'new' thereby rendering the resolutions non-binding. They become more like guidelines, really. That is, if I remember them at all.
I don't foresee myself doing anything different this year. I'll make my resolutions, work some of them in as habit, and then forget I ever even made the others.
I'm resolving to write more. Each week will be rounded out by either a blog post, a full chapter for one of my writing projects, or a full page of research results.
I will read more. Each month will see a new book in my hands and that book will be tucked away in my head, cover to cover, before the next month. I will alternate fiction and non-fiction.
I will be charitable and more gentle in my dealings and in my thoughts, with others and myself.
I will learn to look forward to my future with enthusiasm and grasp it with gumption under my own steam.
I will make cake.


I made this white coconut cake for a baptism back in September. I made a triple batch so that I could make multiple layers and bake some batter in tin cans.
The tin can baking worked out great. The instructions I used recommended wrapping the can in foil before baking. For the cans I was using, that proved completely unnessecary and made for a longer, slightly less even, baking time. Use your discretion and leave about 2 inches of empty space if you should ever bake in a can.
It was moist and very delicate with a rich coconut flavor. I made a coconut butter cream (from a different recipe) and used apricot preserves for filling and topping. Altogether, it was rather a bit too sweet, so next time I bake this I will find some way to cut back on the sugar. Still, the cake itself is probably my favorite of all the coconut cakes I've ever had.


So. Here is my resolution. I will make this cake again, only with a more studied approach. I will take into account the overly saccharine taste of my previous decorating attempts and cut the sugar to its lowest point. I'm thinking that maybe a bitter-sweet chocolate filling would be ticket.


Sweet coconut, bitter chocolate...Simple, decadent...This is going to be a good year.

Tuesday, December 24, 2013

Christmas Eve, 2013

I'm sitting on our couch at home, sipping hot honeyed milk and licking cookie crumbs from my lips. The dog and one of the cats are asleep at my feet. I'm on a break from work. The kitchen's a mess, the tree is up, and I'm mostly done with Christmas shopping. My mom's present is simply going to have to be an epiphany gift.
Santa's cookies this year are old fashioned gingers- if I leave any for him, that is. The flavor and texture remind me of pfefernusse, a German spiced cookie and my favorite holiday treat. In past years, I've thrown a bag (or three) into my parents' grocery cart when we do our Christmas stocking-up, but I didn't find any this year.
Pfefernusse are round, domed cookies coated in white icing. The icing is crisp when you bite into it, giving way to soft cookie underneath. I missed them when our grocery stores failed me.
Fortunately, I still have these Old Fashioned Ginger Cookies.
My mom's go-to recipe collection for cookies has been The Great Big Cookie Book by Hilaire Walden. The page with the ginger cookies is the most batter-spattered page in the whole book. She used to make it exactly as written, but she made some adjustments this time. With two brothers needed extra dietary restrictions and her desire for general well-being for the whole house, sugar was cut (for the most part) and replaced with coconut sugar.
I usually shy away from coconut sugar. It looks funny. It's different from what I'm used to. And it's healthy sugar, which is bizarre. Those hang-ups aside, I liked working with it here. It has a warmer, earthier, spicier scent that is ever so subtle when added to baked goods. It's sweet, but not saccharine- like other sugars and non-sugar sweeteners.
It really is a wonderful substitute for the ol' granulated white stuff and, in our house, necessary. Cancer cells feed on sugar, and thrive on the processed white sugar from sugar cane. The white stuff also reeks absolute havoc on a body's glycemic index. One brother has leukemia, and the other has blood sugar issues. Exit white sugar, enter coconut sugar.
Another change made was the addition of chopped candied ginger. The flavor was so bright and warm. I can't think well of making these cookies the old way- now it's strictly coconut sugar and ginger-bits forever.
We didn't ice these like my dear pfefernusse, but otherwise they were spot-on twins. If you take the time to ice your Old-fashioned Gingers, comment and tell me how it went.

Old Fashioned Gingers
Adapted from The Great Big Cookie Book by Hilaire Walden

2 1/2 cups flour
1 tsp baking soda
1 1/2 tsp ground ginger
1/4 tsp ground cinnamon
1/4 tsp ground cloves
1/2 cup butter, softened at room temperature
1 cup coconut sugar
1 egg
4 Tbsp black molasses
1/2 tsp concentrated lemon juice or 1 tsp fresh
1/3 cup candied ginger
1/4 cup granulated sugar (for garnish. If you're icing your cookies, you might want to skip this ingredient.)

Preheat oven to 325 and chop ginger into tiny bits.

Mix dry ingredients in a small bowl and set aside.

Cream butter and coconut sugar together with an electric beater or mixer, then add egg and mix well.

Stir in molasses and lemon juice. Add dry ingredients, a third or so at a time, mixing well. Then stir in the ginger bits.

Shape the dough into tiny balls, about a 1/4 inch wide. Roll the balls in granulated sugar (if you'll be icing your cookies, skip the sugar roll).

Place them about two inches apart on a baking stone or greased cookie tray, lightly smoosh with a flat-bottomed glass, and bake for 10-13 minutes for soft cookies, or 14-17 minutes for harder, snap-like cookies.

Remove from trays and let cool completely before storing. Or eat right off the counter while still warm. Both are great ideas.

Wednesday, October 24, 2012

October has been a Wonder

Well, it's been an embarrassingly long time since I've last posted. I have not forgotten about you. I've just been preoccupied with my insane commute to school and my jujitsu training. Since my last post I've made the Vinegar Pie once (Notes from that venture will follow in a future post. My mother is keeping the photos hostage.) We've also had some guests from the Netherlands visit us at the Dojo, and I was kept busy with planning, entertaining, and training.

Today, I'm taking a breath. I'm house-sitting very close to my school, so my commute is easier and I have a kitchen to myself. I have a pumpkin roasting in the oven for pie, and another pumpkin on the counter waiting to go in. My best friend, Gamgee, mentioned that he loves cherry and pumpkin pies- but they have to be from scratch. Well, to me that is a challenge, and I gladly accepted. So, I picked up two little pie pumpkins and set out to find a method of cooking them for pies.

I found some instructions on EHow.

So far, so good! I'm going back to Momma's house on Sunday, so I'll pick up her recipe for pumpkin pie crust and finish this pie Monday.

Some time next week, I'll serve Gamgee and a couple other friends this pie with chocolate wine after a dinner of chicken marsala and mushroom stew. Yes, Gamgee is a lucky young man, and I think he knows it.

Sunday, July 8, 2012

The Pie Saga - Part One


I have embarked on a new journey- a journey of pie.

It began Saturday, after an early dinner of shawarma with two of my closest friends. I shall introduce them to you as Killer Queen and the Doctor Esquire. The plan was to leave our lovely shawarma for a production of Twelfth Night in which Killer Queen's brother was starring. But before the play, Dr. Esq. decided to treat us girls to desert at Underbelly.
Underbelly is a relatively new restaurant in town- highbrow, very posh, don'cha know?- and home to the dubious character of Vinegar Pie. That pie was the sole reason Dr. Esq. wanted to go there. He seemed so happy, telling us about his secret treat as he watched our faces. We were surprised and wary. Vinegar is something for fish and dirty counter tops. Its wine gone wrong.
Its pie gone good.
The pie came and, while I was not impressed sufficiently to warrant the gold-gilded price tag, I was intrigued. It was yummy. Pale yellow colour, light flavour, smooth texture. I don't remember the crust, other than that it was good. I decided, looking at Dr Esq. in his sheer, bubbly, pie-induced happiness, that I had to make this pie. Moreover, I had to make it better.

That night, Dr. Esq. invited KQ and me to his family beach house with a couple of other friends for the 4th of July. Perfect. I had an occasion, a deadline, and promise of hungry guinea pigs. It was time for me to make some pie.

A quick foray to Pinterest showed me no one else seemed to even know of the pie. A quick trot to Google led me to a recipe from someone's grandmother and the late 1800's. 

I have no pictures of my own, unfortunately, but here is the link to the original vintage recipe.
http://www.heritagerecipes.com/pie-recipes/vinegar-pie.htm

The recipe is full of spice with a pastry crust and used cider vinegar. I was not up to the challenge of a pastry crust and, since I was house sitting that week and using someone else's pantry, I had no cider vinegar. Fortunately, I can improvise. Seasoned Rice vinegar was at my disposal and a full bag of amoretti cookies. These cookies would make my crust, which turned out beautifully. I couldn't find any ground cinnamon, coves, or nutmeg- only whole sticks and nuts. While the grinding of the spices was tedious (I used a microplane, and a spice-bottle and cutting board for mortar and pestle) I think it added to the flavour. It certainly made the kitchen smell intoxicatingly wonderful. To be fair, I must say here that Dr. Esq. helped microplane the cinnamon and that he did a wonderful job.

My two pies turned out more flat, lower to the crust, and darker than the Underbelly pie. They were more fragrant and a very different flavour- more spicy, darker, and still good. We ate some that night before it had completely set in the fridge.

The second pie, which I made for the 4th, we let chill completely. Unfortunately it partially un-set while waiting for us swimmers to tire of the sea. This made it kind of oily, but the flavour was still the same.
After everyone else had been dropped off at his or her own homes that evening, Dr. Esq. asked for another slice of the first pie that I had kept reserved in the refrigerator.

It was set, cold, and perfectly scrumptious.
We talked about various things that could be changed about the flavour and texture, but, in the end, he pointed out that he felt it was already good enough as is and that I was welcome to make some more for him anytime.

And yet, I still want to make some adjustments.
I need to work on the crust, either by finding a cookie recipe to use specifically for this pie or by learning how to make a pastry crust.
I also want to tweak the flavour, experiment with fruit, extracts, and different vinegars. 
Changing up the texture is my main goal. I want the pie to stand taller and be smoother on the tongue. 
I will record the progress of my journey here, but for now, I sit here on a couch, nursing a sunburn with a tall mug of tea and a thin slice of Vinegar Pie.

Monday, May 7, 2012

Awaiting Summer

Summer teases me. It's almost Summer heat outside, classes are over, and I have so many plans of things to do. But Finals are still clinging with sharpened claws around my grey matter and Summer will not come.

Perhaps this is revenge for all the years I've said that I don't like Summer. It's hot. Too hot. Ridiculously hot. I can look forward to triple digits for my July birthday, consistently.

But I've found a new way to beat the heat, and it's cheaper and healthier than ice cream.

I've ended up calling it Ice-Not-Cream. It has three ingredients: Banana, Peanut Butter, and Nutcao.

That's it.
Really.

I made this for work one day, but I was not able to be there when they served it. The next day, at a luncheon for the Theology department at school, one of my employers complemented me on it and continued chatting it up to the professors around us.

Later one of the guests from work that had had some came up to me and told me how great it was.
One of my co-workers did the same.

A week later, I was at a staff luncheon and my co-workers and employers brought it up again.

It's really good.

I wanted to make this because one of my co-workers and a few of our guests can't have dairy and we had planned to serve ice cream. I wanted everyone to have something creamy and cold, so I whipped this up from a recipe I found through Pinterest.

Here's the original link: http://userealbutter.com/2010/08/12/single-ingredient-ice-cream-recipe/

(Ignore the coffee pot in the corner. We've never used it once at work.)

First, Slice bananas and freeze them. It's best if they are frozen completely solid, not just frosty or sightly hardened. The more frozen, the better.

Second, dump the frozen banana slices into a food processor and blend.


If you froze your slices enough, the bananas will go from chunks to gravel to marshmallow fluff. If you didn't, they will go from chunks to chunky slime to marshmallow fluff. It'll still work, but you'll spend some time looking at it during the slime-stage wondering if it will ever appear as appetizing as you're told it should be- like I did.


Now comes the spontaneous part. Once you have your cold marshmallow-fluff-ed bananas, dump in some Nutcao and Peanut Butter. Or not. Use what ever kind of nut-butter or chocolate substance you want or don't want. And, use how ever much of it you so desire. For 4 1/2 pounds of bananas, I used about four tablespoons each of Nutcao and creamy Peanut Butter. It's completely up to you.


 (Yum.)

Let me give you one piece of advise that I figured out the hard way. Do NOT freeze this after it is made. Because it's made of solids, not liquids, it cannot melt. But it can harden and become impossible to scoop. Keep it in the refrigerator.
If you want to keep it for a very long time, maybe you can store it in the freezer and thaw when you're ready to serve. I just haven't tested it yet. So if any of you try storing this Ice-Not-Cream in the freezer, let me know how that goes!

I have some bananas sliced in the freezer for the family right now. They should be very happy later today.

As for the garden, it's all still growing. The plums are even bigger on the tree. My loquat seed disappeared, unfortunately. I went out one day to find its pot empty. I'm still not really sure what happened. But I had picked up three more seeds from the side walk, so I planted two of them and kept one in reserve.
I also found an avocado tree, about a foot tall, sprouting from the family compost bin. It, and two others that I found as I dug around, are in pots on the front porch for protection.
Our Gardenia from our paternal grandmother is booming and bending under its own weight. I crawled under its branches and layered a couple.
Someday, when I have my own yard (or at least a door step with room for pots) I hope I can keep these plants with me. I want to keep something to care for and something green and full of life.

Until that day, I mind the bananas.

Monday, April 9, 2012

Easter

Easter is here. The largest, most important feast in the Catholic Church. Unfortunately, I haven't done much to celebrate it. Lent came and went and, while I was sure to give it a passing nod in observing mandatory days of fasting and abstinence, I barely did anything else. Usually, I sacrifice some activity or object to help focus on my spiritual growth. Or, I've added a prayer to my days during the season. This year I did neither. I chose to neglect that part of my life. Most people I know would excuse me. I am a full time college student and part time employee. My brother has cancer. I have a lot on my plate. But, as I see it, that means that I needed Lent. I didn't need to abandon myself to my troubles and distractions. I needed to take that season to empty myself and focus my attention on G-d. Now Easter is here, and I wasn't ready.

I did manage to make chocolates for my siblings' Easter Baskets on Good Friday, after confession. My dad wrangled all the kids out of the house for several hours. Except one. Brother Aang (battling cancer, thus bald, thus named Aang) stayed in a secluded part of the house and watched Andy Griffith shows with mom.
I found my recipe from Pinterest. It was originaly for chocolate eggs. I, however, didn't have egg-shaped molds. The author of the recipe says that eggs can be made without the molds by shaping the filling with your hands. This is not so. I made lumps. Lumps of yummyness, yes. But not eggs of yummyness, as I was hoping.

Here is the Recipe, taken from the Instructables I found on Pinterest. Check out the original site for pictures to help you on your own epic quest for the home made cream egg.

http://www.instructables.com/id/Homemade-Cadbury-Creme-Eggs/

  • 170g (1/2 cup) light corn syrup (or golden syrup if you're across the pond)
  • 58g (1/4 cup) butter, room temperature
  • 375g (3 cups) confectioner's powdered sugar (icing sugar)
  • 1 teaspoon vanilla
  • 1/4 teaspoon salt
  • yellow food coloring
  • 1 (12 ounce) bag milk chocolate chips
Cream together the corn syrup, butter and vanilla.
Sift in the confectioner's powdered sugar and beat until incorporated.
Take out about a third of the filling and stir in some yellow food coloring.
Put the two bowls in the fridge, as they're easier to work with once they're set.
Make little yolk balls out of the yellow mixture.  Place them on some parchment. Put them back in the fridge or even the freezer to firm up.When the yolks are set up, you can start embedding them in the whites.  Scoop an amount of white filling out and flatten it into a circle.  Place the yolk ball inside, and wrap the white around it. Stick it in the fridge.
Melt the chocolate in a double boiler or in short bursts in the microwave.
Either dip fillings into the chocolate with a fork and let set on parchment, or skewer the fillings and dip them that way